6 has a lot of problems, looks like it's untested.
1. Keys are unobtainable for no way to get in rooms.
2. Bocok/Shutters not set in the room left of the Sword Swipe Room, leaving a part of the dungeon inaccessible.
Level needs work.
-James
6 has a lot of problems, looks like it's untested.
1. Keys are unobtainable for no way to get in rooms.
2. Bocok/Shutters not set in the room left of the Sword Swipe Room, leaving a part of the dungeon inaccessible.
Level needs work.
-James
Ugh, you're right, there is one key that is on my notes for that level which somehow is missing from the actual file. I will add that (back) in, and put in a walkthrough for the level.
But the room east of the swipe; it's a one-way exit. If you're trying to go north from there, you can't.
EDIT: Uploaded new version. I have no idea how that key went missing....
https://drive.google.com/file/d/0B_ix4ektZqlBeWZPZ1hjdHVxWGc/edit?usp=sharing
[spoiler]
Level 6 walkthrough:
From the entrance, go east twice, kill the enemies, and push a block to reveal a passage.
You arrive in a room with a Like Like. Go east once, collect the key, and then go east again (if desired, the prize there is the compass).
Backtrack west 2 rooms. Bomb the south wall and proceed.
Kill the enemies, collect the 5 rupees, then open the door to the east. You should now have no keys (unless you have extra from previous levels, which I do not rely on).
A room full of Red Darknuts and the boss door to the east. Kill them if you need bombs. If you don't, you can just bomb the south wall and proceed.
Aha, a new enemy! Kill these guys, and push the block to open a passage. Note the southern door that you have no key to open.
A room with 3 Dodongo Babies, and 2 Keese. Should be simple by now. You can go west or north, but let's go west first as that is optimal.
Ah, a new tricky room. Looks like the key you need is held on the other side of those blocks. Kill what you can, then use your whistle (you did purchase the hint from an info-seller in the OW, right?) Walk to the other side of the room and finish up, collecting the key, then backtrack east.
Go north this time.
Optionally, kill these Zols and stand in the sand when you blow the whistle. That gets you the map. If going for speed, just continue west.
Simple room, kill the Keese, or not, up to you. There is a hidden path here, but you don't know that yet. Continue west.
Go north, it's all you can do.
Go west again. Kill the enemies if you like, it can make it easier the next time you pass this way.
Ugh, a push-the-block-room. You can't go backwards, but you can go north (with your key) or south, if you missed it.
Either way you go, you're going to come right back into this room. If you had the ladder already, and went south, then you could take a shortcut back to the entrance, but you don't have the ladder yet.
Back in the block room, push it again, going the only way you can, which west.
Kill the Ropes in this room. I suggest bombing the north wall for a hint that will be useful very soon, if it weren't so cryptic. Damn you, Imzogelmo!
In the Rope room, go west. Lots of going west in this dungeon.
Since you were good and took the hint, you know what to do here. Kill the Keese if they get in your way as you maneuver the invisible maze and go south.
A room full of Red Bubbles. Tread carefully, and go south. The odd lava tiles are a hint, not a bug.
Kill some of the Gibdos if you need bombs. Now you have a choice, east or west. Optimally, go east
Kill the Dodongos. Or don't. You don't win anything here. Bomb the east wall, and go in, grabbing a key.
Back into the Dodongo room, you can go south or west. Optimally, go back west.
Go wet again. A money or life room, oh no! Pay up, and go north.
Kill the Patra, or if you are weak, just run. Use the key you have and go north.
Using the blocks as cover, kill the zillion Darknuts, which should be a hint that this is an important room. Push a block, and collect the ladder (finally!).
Go back south, south, east, east, to the old Dodongo room, only this time, go south.
Kill the enemies here, for a key. Then bomb the west wall and proceed.
Go west again, using that last key.
Kill all the surprisingly easy enemies, but do it blindly, as the floor is invisible. Collect the boss key.
Now to backtrack. East, east, north, west, nroth, north, east, east..push the block...north, north. Cross the lava this time, and open the boss door.
Not that hard of a boss, considering the level. I killed it in one hit, but that was probably luck. Go south, to the Triforce room.
If you want the sword swipe, ignore the Triforce and bomb the south wall.
Go east, talk to the old man for a clue about an upcoming enemy. Go east again.
Kill the Gleeok, find the passage.
Kill the Gibdos. If you leave the room, it takes you eventually out of the dungeon, collecting an extra key on the way. This is fine, but not what I suggest. Find the passage in here, and take it....
A room with Baby Dodongos? Yep. Run away, nothing to see here. You have to go west from here.
Collect the sword slash technique, then go west to walk out, or go east and take the passage back to the room with the Gleeok. I suggest the latter.
Backtrack west twice, then north, collect the Triforce. You're done!
[/spoiler]
And when you get to level 7:
[spoiler]
Level 7:
Enter the dungeon. Go east.
Kill the enemies, and collect the key. Go back west.
Go north, using the key.
Go north again. Kill the Keese, then push the 2 blocks in such a way you can go north. Bomb the wall, and go get a key.
Go west, into a maze path room. You don't know how to go through it yet. So go back east unless you enjoy randomly trying different paths... Even if you do, just go back east.
Go south twice, and east once. Walk through the north wall.
(Quickly) Kill the Gel Tribble, then work on the Keese. It opens up the way forward. Ignore the passage for now, and go north. You can do it, yes you can!
Use your whistle, find the secret passage.
(I think I'll change this to a mix of sand and tile, so as to make it obvious... right now it's rather random).
Use your ladder to dodge while you kill these enemies, and when you come back, there will be no red bubble. It's deliberate. Go north from here.
Old man with a cryptic clue? And a boss door? What?
Backtrack south, take the passage back out.
Go south, then take the passage.
Kill some enemies, then get the map under an Armos. Go south.
Kill the Moldorm, and collect the key. Go west.
Kill the Manhandlas, get the compass. Backtrack east and north.
Bomb the east wall. Kill all the enemies. Don't take the passage (yet), as it's a trick. Go north, trust me on this one.
In this room is the totally-missable Magical Key. You have to push all 4 blocks, in a specific way, to get it though. You should know the pattern by now.
Backtrack south, taking the passage. It's a one-way, and it takes you back to a room you've already seen.
Now you are ready to tackle the maze path, so go west, then into the maze path.
Complete the maze. You will hear a sound letting you know you did it, and there is a small visual cue. Otherwise, you may be confused here.
If you don't have the Magical Key, go south, kill some bad guys, get a key. Otherwise, go west.
Don't even bother, just go south.
Go south again, but you have to cross a fun-looking room.
Bomb the west wall for a familiar hint from an old man, but the way forward is east.
Go north, find the push block and passage.
Whoo-hoo, a break! Grab the money and go north.
Light up the room, and go north again. Kill Moas to desired kill level.
Enjoy the rare room where you must kill stuff to proceed. You will then go through the shutter door to the east.
Feed the Goriya, and go north.
If you're brave, go grab the potion. Otherwise, go east. If you have the Magical Key, this won't be an issue. Otherwise, I hope you got the spare key from level 6.
Yikes, hard room. Run away! (Go east)
You've seen this room before, but not on this side of the barrier. Kill the enemies, then consder carefully what to do, as this is one of the most difficult rooms in the game. Push the block that will move, and then take the passage.
As you exit the one-way passage, you're going to go south, then west, then north, then east twice. You should pick up the boss key along the way.
Go back north, then east, to the former Feed the Goriya room. Take the east path this time, into the maze path, and then east again.
Find your way back to the old man who told you the path solution, and unlock the boss door.
Go into the boos room, but surprise, you're not done yet. Go north.
Kill bad guys, collect treasure.
Backtrack to the passage, and walk through the west wall.
Go west, complete the maze path. Same as before, go west, south, south, east, north, and take the passage.
Go north, north, east, north, east, and east again, to the aforementioned "hardest room".
I call it the hardest room because there's another passage. Push the block, ignore the passage, then push the other block. Take the second passage.
Land in a room, go east, slay the beast. Go south.
Pick up the Triforce. Victory is yours!
P.S. There's a hint on the OW about the chicken. You may want to follow through on that before you go on to level 8.
[/spoiler]
Level 8 is pretty straightforward. There is one wicked secret, but it only has 2 passages (one which is a massive backwards shortcut). It relies more on hardness of enemies, and features a boss that is really tough, since my bosses generally are not the highpoint of the levels. I strongly urge you to take a red potion into that fight.
Level 9 is hard. Perhaps too hard. I am almost certain I'm going to thin it out a bit.
The Lv. 6 bug is still not fixed. (thanks for unpasswording your quest so I can find bugs a little better, and I can play my own music testing. 😊 )
Thjere's still no way to access Screen 54 or that sequence.
You need to find a way to make that section accessable.
-James
Nightmare wrote:The Lv. 6 bug is still not fixed. (thanks for unpasswording your quest so I can find bugs a little better, and I can play my own music testing. 😊 )Thjere's still no way to access Screen 54 or that sequence.
You need to find a way to make that section accessable.
-James
I see how you might say that...
There's a script in screen 42 which removes the obstructing block if/when you get the Triforce. That allows you to exit all the way out of the dungeon, if you so chose. The purpose of the block is so that you can't get the Triforce through the back door without beating the boss... If I could detect the boss having been beaten, that would make a better condition to check for. I'm not quite sure how to check for that, though. I'm open to suggestions of how to achieve that better, as long as you don't say walk-through wall (those only appear in odd-numbered levels).
EDIT: Stupid me. I see how to do it now. It's a quick change, too.
Updated with the quick fix above, as well as some other changes to address difficulty issues:
https://drive.google.com/file/d/0B_ix4ektZqlBNGNmWHFJeGJBcDg/edit?usp=sharing
Changes:
Removed some enemies in Level 2. Made the path to the item easier.
A few overlooked rooms with Bubbles not the first enemy were switched around. I think there are still 2 in the whole game, which were intended.
Removed some enemies from a particularly hard room in level 9.
Changed the script in level 6 to detect the boss being defeated, not the collection of the Triforce.
Wrongfully walk-thru blocks in level 5 made solid.
Made it so 2-block puzzle in level 5 is a little more obvious. The same kind of puzzle later in the game will not be flagged as such.
[MENTION=38509]Nightmare[/MENTION]: I think you originally had an older version of the quest, as several of the early bugs you found were some that I found in my playthrough (missing return point, murder in level 2, bubbles out of order in level 1). So, there were a couple of other OW secrets that had been added to the 11/16 version, which may be important.
I forgot to remove Darknuts from level 1. D'oh!
I'll go playing around in 1 and 2 in a bit, 5 is much better, but 6 is still screwy. There's still no way to access Screen 54, period.
Please make the door west of the swipe open. It's the most logical solution to fix it, and makes the most sense quest-wise.
Edit: Remove the Blue Goriyas and some of the Mini-Dodongos on the way to the Raft. Everything else in 2 looks OK. The stronger enemies should discourage people from taking the wrong path.
-James
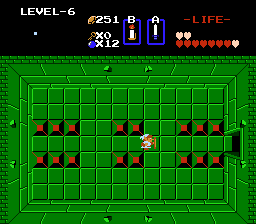
You can get to screen 54 from here. Note that in the old version, the block disappeared only if you took the Triforce. It now is tied to defeating the boss. (In my tests, I found that a save file from before the script change won't work even with the new file, but if you collect the Triforce in the old version, you will see the block disappear, as it does now with the defeat of the boss).
Map of the level, perhaps it can help:
https://docs.google.com/file/d/0B_ix4ektZqlBYnJ2aE5ZMjdvZEE/edit
EDIT 2: I could open up the one-way on screen 74 without harming the flow, but my fear is that it would be too confusing when seeing the block that can move but nothing opening. Once on screen 64, there should be no way to go up or right, as that could lead to sequence breaks.
EDIT 3: I've removed the Darknuts in level 1, replacing with Ropes and Stalfoses. I also have removed the Blue Goriyas in level 2 along the path to the raft, except the solo one guarding the raft itself. I took the Dodongo Babies from 7 down to 3 in the room just prior to it. I cut a couple of Darknuts from level 6's treasure room also.
Completed 6 and 7.
1. Did not need to remove the Darknuts from that room in 6.
2. Green Gibdos don't animate properly.
Onto 7!
Edit: 7 beat. Some of the secrets were obscure, but generally, easy level. Moving on!
Edit 2: Level 8:
1. Damn, business picked up!
2. Different color for Fire Gleeok please. No excuse for that one.
3. Fire Gleeok's fire glitchy.
-James
Accidentally double posted-- nothing to see here--
I told you level 8 was hard. XD
The boss of level 8 killed me a lot of times. Seriously-- BRING YOUR POTION. I toned it down ever so slightly, so it's not quite as bad as when I ran through it (I can elaborate more if needed), but it's still quite tough.
EDIT: Changes in pending update:
Level 1 - Darknuts gone, replaced with Stalfoses and Ropes.
Level 2 - Blue Goriyas replaced with Red in path to the raft, except the solo guy in the actual treasure room. Went from 7 to 3 Baby Dodongos in previous to treasure room.
Level 6 - Ladder room bumped up to 9 Darknuts.
Level 7 - whistle->secret room altered cosmetically, to make it more in line with similar secrets.
L2 Gibdo's animation fixed. Whoops!
[MENTION=38509]Nightmare[/MENTION]: I'm not sure what you mean about the color and fire of the Fire Gleeok. Perhaps I have an offset wrong?
Use a different boss palette, make it red or something.
BTW, "oh shit" moment when I saw your 150 Rupee Leave Your Life or Money Room, lol, and I had 0. Save/Quit.
-James
Yeah, sorry about that money or life bit. I completely forgot about that... should've warned you. It's especially mean on a level where you use the arrows so much-- but it's level 8 of the 5th quest, right? :P
The wand counts as a "Ranged weapon" though, so it helps a bit.
I know you hate a certain item, and hopefully you can find it in your heart to forgive its inclusion here. Given the difficulty of this and the last level, it may be warranted.
Actually spent it on the bomb upgrade, that's how I ran out of money, lol.
-James
Yeah, I came >this< close to putting a wallet upgrade in this quest. Went for a few generous Moblins instead.
EDIT: Changes in pending update:
Level 1 - Darknuts gone, replaced with Stalfoses and Ropes.
Level 2 - Blue Goriyas replaced with Red in path to the raft, except the solo guy in the actual treasure room. Went from 7 to 3 Baby Dodongos in previous to treasure room.
Level 6 - Ladder room bumped up to 9 Darknuts.
Level 7 - whistle->secret room altered cosmetically, to make it more in line with similar secrets.
L2 Gibdo's animation fixed. Whoops!
Level 8 - Fire Gleeok has a much more menacing deep red color now. Fire still looks off somehow, but I'm not quite sure what to do about it.
EDIT 2:
Link for update with above:
https://drive.google.com/file/d/0B_ix4ektZqlBN2FzeWk3UXlhUjA/edit?usp=sharing
Beat 8. That boss battle wasn't horrible.
-James
Oh, there's another Money or Life in level 9, so take some rupees with you. Also, it's got influence from Zelda II's Great Palace: Translation, long, complex, with dead ends and hard fights. What did you expect from me at this point?
Hope you're enjoying the quest despite the, ahem, hiccups.
I'm too tired for Lv. 9 tonight. Maybe tomorrow.
It's now a ROMhack. lol. (stupid Pols Voice)
Edit: I don't know where the bug is, been checking your file, but basically, your 9 is impassable puzzle-wise. I think it's where you intended to nail the Fire Gibdos with some other enemies with two statues on the bottom, but I'm not sure. But either way, it's not completable. You're going to have to re-think your puzzle and fix it. I think you outdid yourself.
BTW, just so you know, my music list for testing:
1. Frog's Theme, Chrono Trigger
2. TMNT Stage 5 Arcade
3. Final Fantasy Legend 2 - Aspiration
4. Blaster Master - Stage 7
5. Dance Dance Revolution - Butterfly
6. Dragon Warrior - Alefgard's Theme
7. Castlevania - Vampire Killer
8. Mega Man Battle Network 3 - Copyman
9. Battletoads and Double Dragon - Level 5 (really appropriate, since the level is Battletoads and Link: The Ultimate Disaster. 😉 )
Edit: More bugs:
1. Lanmolas shouldn't drop anything except when totally dead. NES quest.
2. Moas don't animate properly
I think I'll grade you at this point. It won't change much.
Difficulty: 98/100
Very balanced. Lv. 9's a bitch, but who cares at that point, the player has to earn it.
NES authenticity: 10/100
Where can I start? Mirror Shield? Conveyor Belts? Sword Swipe, double secrets (which I think are clearly against the rules, but we're not DQ'ing for it), among other things. I'm giving you 10 points for generally your class in handling these things, ESPECIALLY the Z2 message for the Sword Swipe, but mostly, terribly inaccurate. But I think you knew that.
Fun Factor: 95/100
Very creative, and except for the early Lv. 2, enjoyable.
Mini-Dodongo candidate for Best Normal Enemy
Overall: 67.6/100 Another "fun but not going to win" quest. Mostly fails for authenticity, but basically falls in line with LFF's, Shoelace's, and others: Good experience, but people just stayed truer to the NES and this will eliminate this eventually. Start working on the story and an alternate tileset and this will probably make a great custom quest.
-James
Spoilers:
[spoiler]
Regarding the room in level 9 with the Gibdos:
You'll use your mirror shield to bounce the statues' fireballs into the Gibdos (See, mirror shield as a tool, not just pretty). A bridge is built when they die.
Regarding level 9:
It's passable. I've beaten it, but there are several one-way passages (think level 8 second quest) and passage loops (think my level 6). Of course, it goes off-map a lot (think my level 4), and features the combination of most of the tricks used throughout the quest. I'd make a video of it if I knew how, lol.
Regarding the Lanmolas:
I'm not sure about those, but I believe NES Moldorms drop items on a per-segment basis. Will have to check this. (Could be a case of being more NES authentic than the original ZC). It's like the situation with the statues-- Original NES statues will not fire on you if you're within a tile of the shooter (which is not centered on the statue). So 1st and 2nd quests need a bugfix, and 3rd and 4th can be considered to have "upgraded" statues.
Regarding the Baby Dodongos (and other custom enemies):
Thanks for the compliment on those. They were clearly inspired by the Ocarina of Time / Majora's Mask version of the enemy, so not completely original, but that's OK. I wanted to use something known to exist in the Zelda universe, so I pictured my level 2 as a sort of den of Dodongos.
Personally, I am more fond of my Moas though. I made them impossible to stab, but beatable by the sword beam (and other ranged items). The theory being that they fly too high to stab, obviously.
For the Fire Gibdos, I wanted to make an upgraded version of those, but did not want to be strictly "give them more HP and damage" which I find to be a lazy way to make an enemy, so I gave them a weakness on an item that isn't often thought of as a weapon. Making them weak to fire gives the Red Candle a reason to exist, and besides, it just makes sense that a mummy would burn up.
Regarding the message for the sword slash:
With that message particularly, but also a few others, I actually ran what i wanted to say through a translator into Japanese and then back to English, to give it that "almost but not quite right English translation" sense. I'm glad you picked up on that. I think that's a great boon to NES authenticity. 😊
Overall:
I tried to build the quest as a successor to not just the first 2 quests, but to all the first 4 quests. So enemies and new tricks included in any of those will appear somewhere in here.
By doing so, it can be no more authentic than the least authentic of the first 4 quests, which is the 4th quest, and of course, by adding in new tricks, it becomes even less authentic.
I gave myself the additional constraints of having every level be skippable by at least one, for non-linearity, and using walk-through walls only in odd numbered levels, to keep you on your toes. Non-linear play is crucial to NES authenticity; the first 3 levels of the first quest can be played in any order, for instance. I do reward the intrepid player--if you play out of order, the quest is significantly easier in some places, but still not broken (2nd quest, I'm looking at you!).
Players should not be daunted by the difficulty too much. A lot of the difficulty arises from my assumption that, if you're playing the 5th quest, you know to go looking for sword upgrades and potions early. I can't beat it without dying, but I'm not the best player. The difficulty is more puzzle- and riddle-based than ZOMG killer enemies.
You cite my creativity here, and I think that perhaps got the best of me when making the puzzles. Each level I tried to defy some expectation that one has in an NES quest. I'll elaborate more on that later (let some others play it before I just outright point them out). So yes, you're right that I knew it was veering off of the NES quest authenticity, but to me, the most important thing in the NES quest is the unexpected (2nd quest: walk through walls, sword-shooting Stalfos, Red Bubbles, one-way passages...).
[/spoiler]
Imzogelmo: Download OBS. That takes videos of quests. That's what I use for the most part.
FRAPS don't work too well on ZC.
Now if I could only fix the sound card and not have to use the mic to record.
-James
Completed, except for the maze path at the end (which I HATED), it was not the hardest dungeon I've played, some of them in James Quest and 2 are nastier.
Few suggestions:
1. Slightly slow down the ROMhack Pols Voice. They're ridiculous in speed and un-Zelda like.
2. Switch the Red Ring and Silver Arrow. Most players will not survive that long.
3. You've got to color mark multiple secrets. I can't tell you how many times I took wrong passageways or reset in frustration because I didn't know. Mark them, ALL of them. Every level they're around.
4. Put a "Super Patra" (like a Red Patra) into the maze room. Whatever pattern you want, have the center shoot fireballs. (not a Patra 2). Be good for tradition.
Grade: Nothing changed. Enjoy!
-James
To have stumped you in the few places where I did makes me glad. I made a quest that I felt would surprise new and experienced players alike, which I hope adds to the fun factor.
I poured my heart and soul (and body and mind... seriously, I OD'd on caffeine working on this thing) into it. I focused so much, some of the ideas came to me in my dreams. I wanted to include conveyor belts all along (and it had nothing to do with Gleeok's "Conveyors may be OK" comment, but that was reassuring). Of course the maze paths were something I was thinking of from the beginning too, since I even asked about it in the discussion thread. Beyond that, the ideas stemmed from asking myself "how can I do something unexpected within the rules?" I believe I kept within the rules very closely, maybe not the spirit of them, but the letter of them anyway. If it wasn't against the rules, I kept my mouth shut so I could use it. 😊
[spoiler]
Dungeons
Dungeons may be made as large or small as one wants and with any room configuration one wants, but the design of any particular room must be consistent with the first four quests. This means one wall on each side, one door of any type at most situated on a wall. The contents of a particular room are left to the designs of the quest maker, but as with the graphics and added items/enemies, faithfulness to the NES design is paramount. Conveyors may be okay. Large superstructures that require the use of several items to destroy may not.
Specific Dungeon Rules
* One DMap per dungeon level! And all DMap Flags must be disabled for dungeon DMaps.
* The Continue screen must be the dungeon's inner entrance screen.
* The Compass Marker screen must be the Triforce Fragment's screen.
* The Triforce Fragment's screen must warp Link to the dungeon's entrance in the overworld. (This is done by setting Side Warp A, by the way.)
* The statue combos in the dungeon's inner entrance screen and the Triforce Fragment's screen cannot shoot fireballs.
* No "Fall From Ceiling" enemy patterns.
* All dungeon DMaps must be "NES Dungeon". So no Interiors with persistent secrets and non-functioning doors.
* Don't use the "Treat as Interior Room" flag to bypass various limitations of the "NES Dungeon" DMap type, either.
* There must be exactly 9 levels; no more, no less. Each level must have a map and a compass. You must use boss keys and boss doors. Each of the first 8 levels must contain at least one preprogrammed boss, one triforce piece, and at least one collectable item. The ninth level must only be accessible by collecting all eight triforce pieces. The boss of level 9 must be Ganon, and the
final goal of level 9, and the quest, is to save Zelda.
* Levels must use one of the NES dungeon palettes, and two or more levels can't use the same palette. Level 9 must use "White/Red".
* One Ganon per quest, and one Zelda per quest.
* A "Level 9 Entrance" screen must appear somewhere in Level 9 between the dungeon entrance and Ganon's screen, and can only be used once.
[/spoiler]
My baby Dodongos were my first real attempt at original sprites, so I'm surprised you didn't trash them, lol. I actually made the concept of them before I went about setting their traits in the enemy editor, so that is probably why it feels more authentic than some other enemy editor creations. Even so, I still like the way the Moas turned out more. If I were doing an unrestricted quest, i'd probably make more Moas, in 3 or 4 flavors.
Thanks for playing, and I'm glad you had a fun time. I'm surprised you enjoyed it that much, all things considered. 😊
I think I'm late to the party for this one.
Finished first two levels. Level 2 did kill me once, but it wasn't the hack-fest I read about. Didn't see anything about ...
[spoiler]... having to push two blocks in one room. Perhaps that means I missed something; so far I got the blue candle, the raft, and the first bomb upgrade from the levels, and the white sword and two HCs from the OVW.[/spoiler]
Found Level 4 easily enough; not sure if I need to buy a key before entering, or whether I should have an extra key from Level 3.
Currently stuck looking for Level 3 (as well as 5,6,7,8 ... 9 was easy to find), as well as the blue ring and power bracelet.
Coyote, you seem to be right on track as far as the items go. Level 2 has been toned down a bit from what it originally was. You'll probably find level 3 to be a bit easier than 2.
As for having to press 2 blocks, there is one very cryptic clue about it, but just know that if you hear the secret sound, it's not a mistake--something has changed so keep looking.
Hint: To access level X, you'll need an item from level X-2 (with 2 exceptions which you'll probably figure out later). Pay-for-info ladies are very useful in this quest, so I threw 4 of them in there. I think each one has 2 useful clues. If I get too many complaints about enigmatic features, I'm open to adding another clue in there.
Funny thing: the first thing I tried upon continuing, I found Level 3!
Now I know everything relevant about the OVW except for (a) one HC, and (b) the location of one level.
Will do more tomorrow.
I think I found a 'stuck' error: in Level 5, the 'Leever Room' doesn't have a staircase back, and I got stuck. Had to quit/save and come back.
If all else fails, use the whistle.
Imzogelmo wrote:If all else fails, use the whistle.
Yeah, I should have made that gimmick a bit more obvious... (go stand on that blank tile, and use the whistle again).
Imzogelmo wrote:Yeah, I should have made that gimmick a bit more obvious... (go stand on that blank tile, and use the whistle again).
There's a lot going on with secrets, especially with Levels 6 and 7. (Haven't started 8; can only wonder at this point.) Might be a bit too obscure in some places.
Coyotek4 wrote:Wow ... would NOT have thought of doing that.There's a lot going on with secrets, especially with Levels 6 and 7. (Haven't started 8; can only wonder at this point.) Might be a bit too obscure in some places.
Double blocks should be made that way too. (grrrrrrrr)
-James